How to Install and Hosting Discourse Community
Discourse is a powerful and modern platform designed for online community engagement and discussion. It provides a user-friendly interface that encourages active participation and fosters meaningful conversations among community members.
Discourse’s Key Features
- Discourse offers a range of features to enhance community interaction, including:
- Categories and Tags: Organize discussions into specific topics for easy navigation.
- Trust Levels: Gradually increase user privileges based on participation and contributions.
- Notifications and Digests: Keep users informed about new posts and updates.
- Likes and Bookmarks: Allow users to show appreciation for valuable content.
- Private Messaging: Enable private conversations between users.
- Flagging and Moderation: Facilitate community moderation and content management.
Preparing to install and host Discourse
- Domain for the Discourse forum
- Cloud hosting services for the server (Amazon Lightsail, Vultr, Linode, etc.)
- Email delivery management services (Amazon SES, Mailgun, SendGrid, etc.)
Once you have all the prerequisites ready, you can install and host Discourse on the server. In this example, we will use Godaddy for the domain, Vultr for cloud hosting services, and Mailgun for email delivery management services. You can refer to this example to host the Discourse Community even if you use different services.
a server in Cloud hosting Service

On the main page of the cloud hosting service, create a new server. If you are using Vultr, you can click on the blue [+] icon at the top right to create a new server.
Select server specifications

The server specifications are chosen with the most affordable options. You can change the server specifications at any time when the number of users on the Discourse forum increases.
Select a server location

Choose the server location. When selecting the server location, it is advisable to specify a location close to the prospective users of the Discourse forum. If you are considering building a community for Japanese users, please select a server in Japan.
Select a server image

Select the Server Image as Ubuntu 20.04 LTS x64.
Select a server size

You can change the server size anytime according to the increase in Discourse Community users. It is recommended to start with the smallest server size and gradually increase it.
Server hostname and label

When you end up creating many servers, it can become confusing, so it’s best to assign them with easily recognizable names. It is ideal to align them with domain names.
Check the server’s main IP

Once the server creation is complete, you can find the Main IP of the server on the server’s detailed information page under the [Settings] tab. The Main IP is required when connecting it with a domain.
Connecting servers and domains
You can purchase a domain from domain services such as Google Domains, Godaddy, NameCheap, etc. If you already have a domain, navigate to the DNS settings page for that domain.
Enter the server ip in the domain

Set the type to ‘A’ and enter ‘*’ in the Host field. Then enter the Main IP of the server you created in the cloud hosting service in the IP Address Value field.
Connecting a server to a subdomain

If you are building a Discourse community as a subdomain of your main site, you can connect it as a subdomain. In the Host field, enter the name you want to use as the subdomain. By setting it up like this, it will be connected to the domain as follows.
forum.appflix.ccVerify domain connections
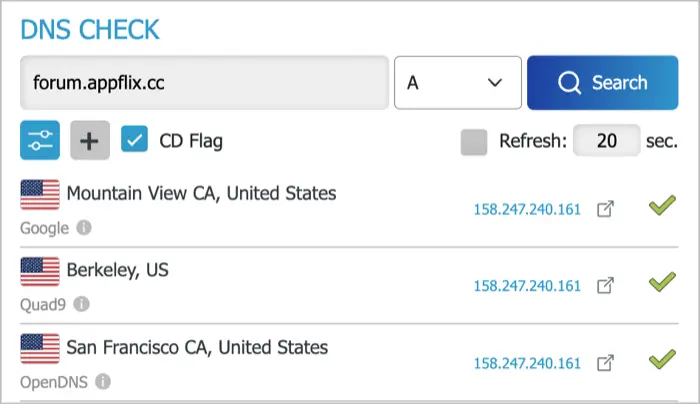
You can use websites like DNS Checker to verify if the domain and server are properly connected.
Set up an email server
Before installing Discourse on the server, you need to connect the email server. Discourse is a community platform that requires email verification for users to register on the site. Additionally, notification messages are also sent to members’ emails. Because of this process, it is essential to establish a connection with the email server.
Add a domain to the Email Server service

In this example, we will use Mailgun as the email server service. Select “Domains” from the left sidebar, then click the “Add New Domain” button at the top right.

Enter the domain connected to the server you created for Discourse and click the “Add Domain” button.
Adding record values from the email server

Once you’ve added the domain, you need to connect the email server’s record values to your domain. Leave this page and go to the domain DNS management page.

Add the type, name, and value from the records available in the email server.

Click the “Verify DNS Settings” button to check the DNS connection status. If the domain and email server are successfully connected, a green checkmark will appear on the left side of the record.
Create an SMTP user for your Discourse community
When connecting the email server to the domain, the default SMTP user that is set is “postmaster@forum.appflix.cc”. You can create a new SMTP user for the Discourse community.

- Click on “Domain Settings” in the Mailgun sidebar.
- On the settings page, click on the “SMTP credentials” tab.
- Verify the domain that is set up and click the “Add New SMTP user” button.
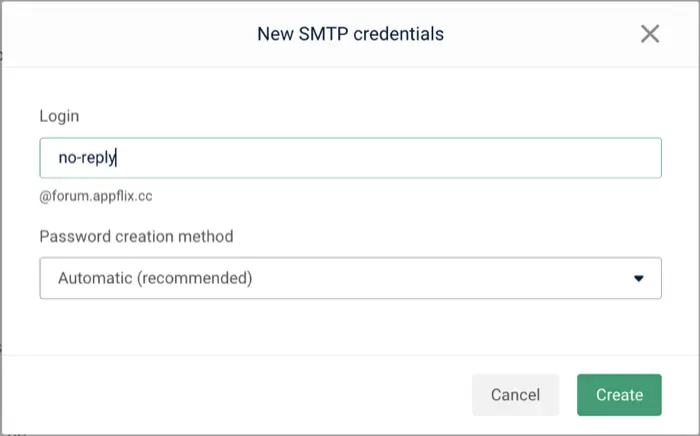
Enter the SMTP user name and click the “Create” button.

Once the SMTP user has been successfully added, you can see it in the list. Although you cannot view the password, if you need the password, you can click the “Reset Password” button to reset it and then copy and use it.
Configure the server
Before installing Discourse on the server, you need to configure some security settings and install Docker.

Go to the cloud hosting service page and navigate to the detailed page of the server you created for Discourse. Run an SSH terminal or console.
If you created the server on Vultr, check the username and password, then proceed with logging in through the “View Console” option. Alternatively, Windows users can access SSH through PowerShell or cmd.exe. Linux and macOS users can access SSH through the terminal.
$ ssh root@11.11.11.11Enter your own server’s IP as shown above and connect.
Set up server security
Turn on automatic security updates by entering the following command.
$ sudo dpkg-reconfigure -plow unattended-upgradesInstall the Uncomplicated Firewall (UFW) package. UFW is a user-friendly command-line tool for managing firewall rules on Ubuntu-based systems.
$ sudo apt-get install ufw
$ sudo ufw default allow outgoing
$ sudo ufw default deny incoming
$ sudo ufw allow 22 comment 'SSH'
$ sudo ufw allow http comment 'HTTP'
$ sudo ufw allow https comment 'HTTPS'
$ sudo ufw enable
Install fail2ban for server security.
$ sudo apt install fail2banConfigure to use fail2ban and ufw
Copy the default configuration before package updates.
$ sudo cp /etc/fail2ban/jail.conf /etc/fail2ban/jail.localModify the configuration file using the nano text editor.
$ sudo nano /etc/fail2ban/jail.localChange the default configuration to UFW as shown in the image below.

After making the changes, press [Ctrl + X], save the modified file, and press [Enter] to exit the editor.
Installing Docker
By installing Discourse using Docker, you can simplify the deployment, scalability, development, and management processes of the application, while maintaining consistency and compatibility.
To reinstall Docker with the latest version, remove all the programs related to the previously installed Docker.
$ sudo apt-get remove docker docker-engine docker.io containerd runcThis command updates the local package list with the latest information from the repository. This way, the available packages and their versions are refreshed.
$ sudo apt-get updateThis command installs the necessary dependencies: ca-certificates, curl, gnupg, lsb-release.
$ sudo apt-get install ca-certificates curl gnupg lsb-releaseDownload the official GPG key for Docker and save it as /usr/share/keyrings/docker-archive-keyring.gpg. This GPG key is used to verify the authenticity of the Docker packages.
$ curl -fsSL https://download.docker.com/linux/ubuntu/gpg | sudo gpg --dearmor -o /usr/share/keyrings/docker-archive-keyring.gpgTo add the Docker repository to the APT sources, create a new file called /etc/apt/sources.list.d/docker.list and add the appropriate repository URL based on the architecture and Ubuntu release.
$ echo "deb [arch=$(dpkg --print-architecture) signed-by=/usr/share/keyrings/docker-archive-keyring.gpg] https://download.docker.com/linux/ubuntu $(lsb_release -cs) stable" | sudo tee /etc/apt/sources.list.d/docker.list > /dev/nullUpdate the package list again to include the newly added Docker repository and fetch the latest package information.
$ sudo apt updateInstall the latest version of the Docker engine and related packages.
$ sudo apt-get install docker-ce docker-ce-cli containerd.io docker-compose-pluginInstall Discourse
Create the /var/discourse directory. This directory will be used to store Discourse-related files and configurations.
$ mkdir /var/discourseClone the Discourse Docker project from the https://github.com/discourse/discourse_docker.git repository to the /var/discourse directory.
$ git clone https://github.com/discourse/discourse_docker.git /var/discourseChange the current working directory to /var/discourse.
$ cd /var/discourseRun the discourse-setup script. This script is responsible for installing and initializing Discourse, and it may provide the user with several configuration options. When executed, the script will install the essential components of Discourse and complete the initial setup.
$ ./discourse-setupThe following image shows the completed configuration after installing Discourse.
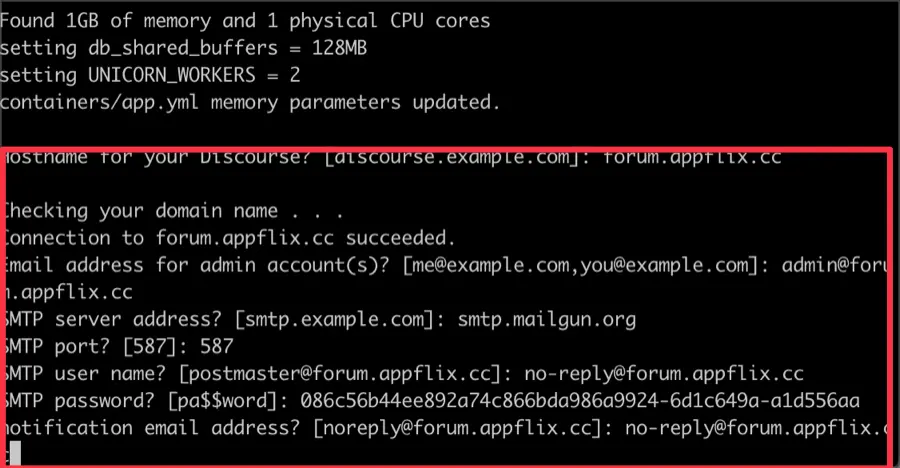
Host name for your Discourse?
Enter the address of the domain you connected to the server in front of this example. e.g., forum.appflix.cc
Email address for admin account(s)?
Enter the email address you want to use as the administrator account for this Discourse site. e.g., appflix@gmail.com
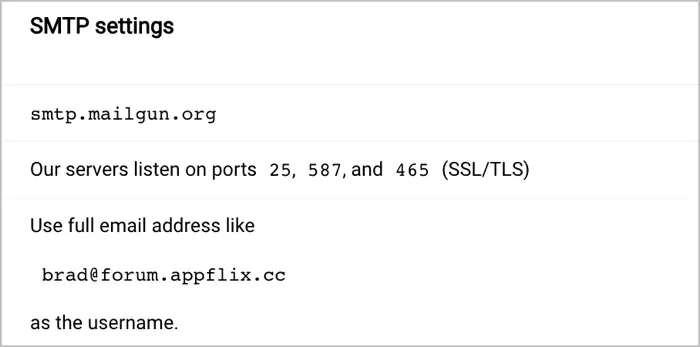
SMTP server addrees? & SMTP port?
Enter the information of your current email server. Typically, your email server provides the following information, as shown in the image below.
SMTP user name? & SMTP password?
Use the user account and password you created when connecting the domain and email server previously. (Refer to the image below)

notification email address?
If possible, use the ‘no-reply@example.com’ email address you created earlier.
If you entered incorrect information, you can reconnect through SSH terminal or console, navigate to the directory, and proceed with the configuration again.
$ cd /var/discourse
$ ./discourse-setup
Getting Started with Discourse

Enter the domain address in the web browser’s address bar and click the [Register] button to proceed with account registration.
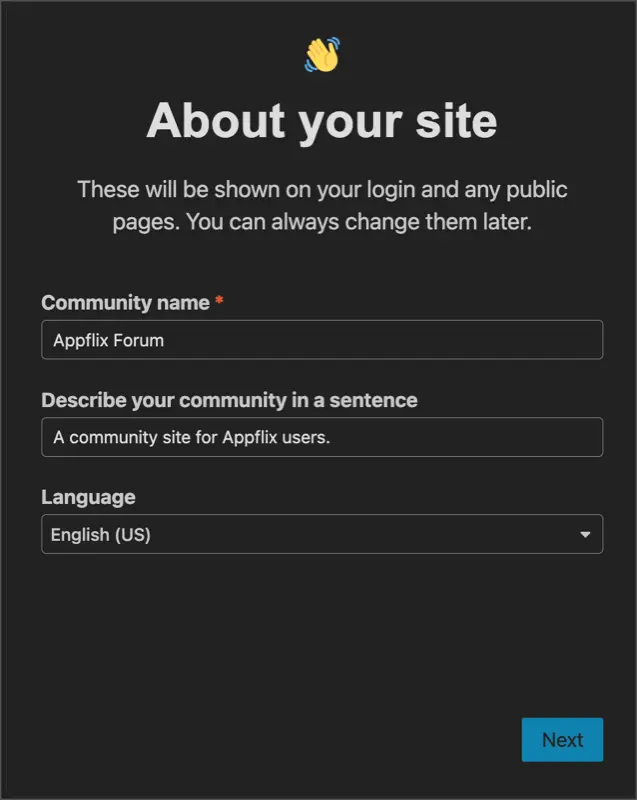
After completing the account registration, the Discourse site configuration wizard will start.

Once the site configuration is complete, navigate to the [Admin] page and go to the [Upgrade] tab to upgrade Discourse to the latest version.
By following these steps and using cloud hosting services, email server services, and a domain, you can install the Discourse platform and create your own community site.